


If you’ve ever felt like your day disappears before you’ve accomplished what truly matters, time blocking in Notion might be the game changer you need.
A Notion time blocking planner helps you take control of your schedule, plan your day hour by hour, and focus deeply without distractions.
Unlike a basic task list, time blocking in Notion encourages you to assign specific time slots for each activity — from deep work and meetings to exercise and personal time.
You’ll know exactly what to focus on and when. The result? More clarity, less procrastination, and better work-life balance.
What you’ll learn
- Structure your week with intentional time blocks in Notion.
- Build a flexible system that adapts to your schedule and priorities.
- Use linked databases to automate your planning workflow.
- Organize your day around focus, energy, and context.
- Design an aesthetic Notion dashboard for productivity
List out your daily & weekly activities
Before you start building your Notion time blocking planner, take time to list out your daily and weekly activities. This step helps you clearly see how you spend your time — and what truly matters.
Start by doing a brain dump of everything you typically do in a week. Include both work and personal activities — meetings, emails, project work, study time, exercise, family routines, and even rest breaks.
Next, categorize your activities into clear themes or contexts. Common examples include:
- Deep Work / Focus Tasks (writing, design, coding)
- Admin / Shallow Work (email, planning, errands)
- Learning / Growth (reading, online courses)
- Health / Fitness (workouts, yoga, meal prep)
- Personal / Family Time (dinner, downtime, social)
By grouping tasks this way, you’ll quickly see where your energy goes each week. These categories will later become filters and views in your Notion time blocking dashboard — helping you plan your day around focus, balance, and flow.
Once your list feels complete, you’re ready to move on and build your Activity Database in Notion, which will act as the foundation for your time blocking system.
Create a daily activity database in Notion
Once you’ve listed your daily and weekly routines, the next step is to create an Activity Database in Notion. This database acts as your master list of activities, helping you organize, categorize, and reuse tasks easily for your time blocking planner.
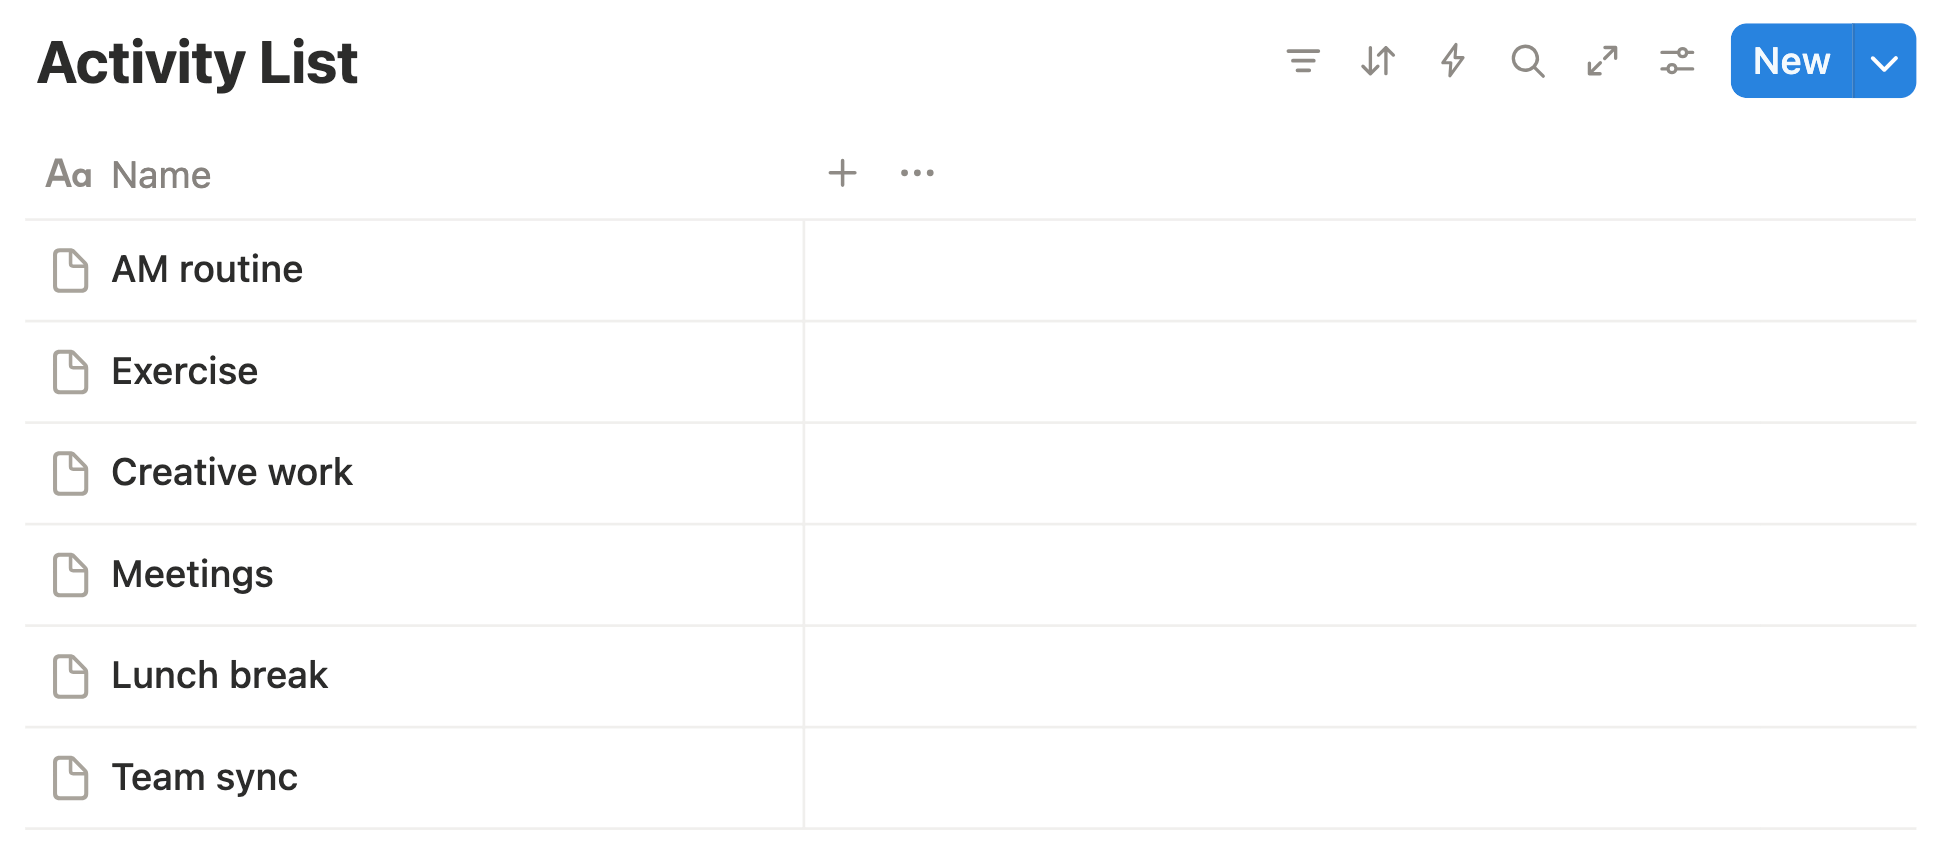
Step 1: Create a New Database
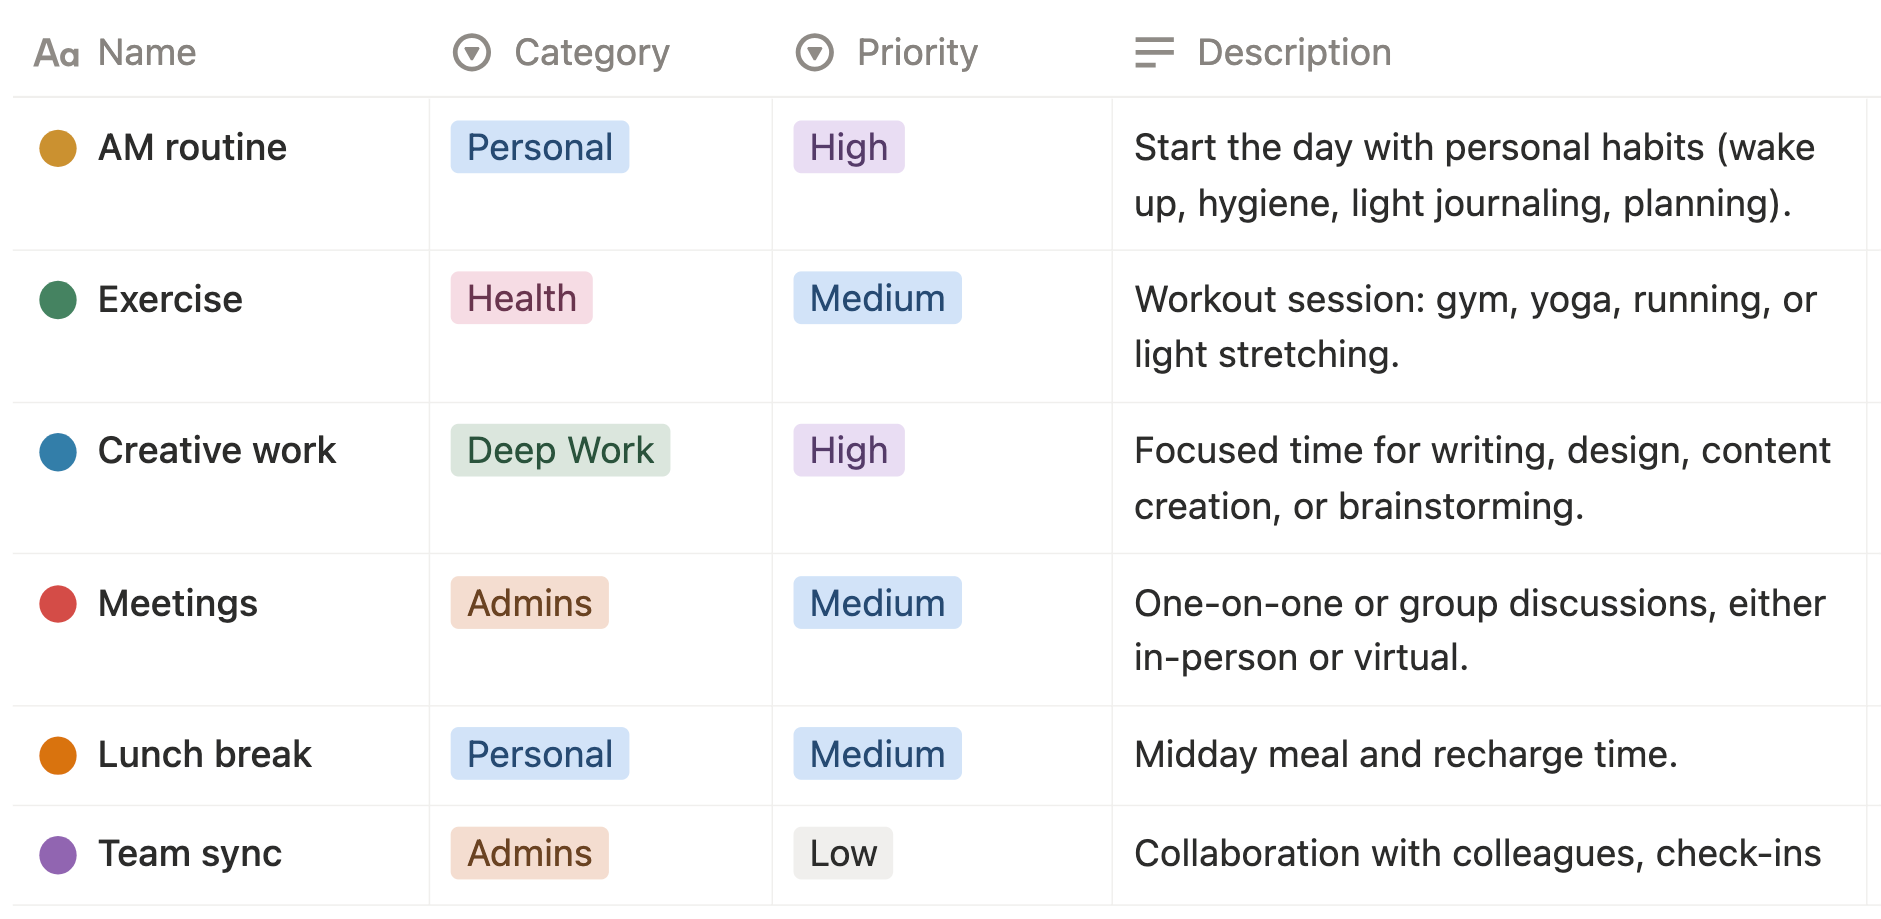
Start by adding a new table database in Notion. You can call it “Activity List”. Each row represents one unique activity that you regularly perform — whether it’s a recurring deep work session, gym workout, or weekly team meeting.
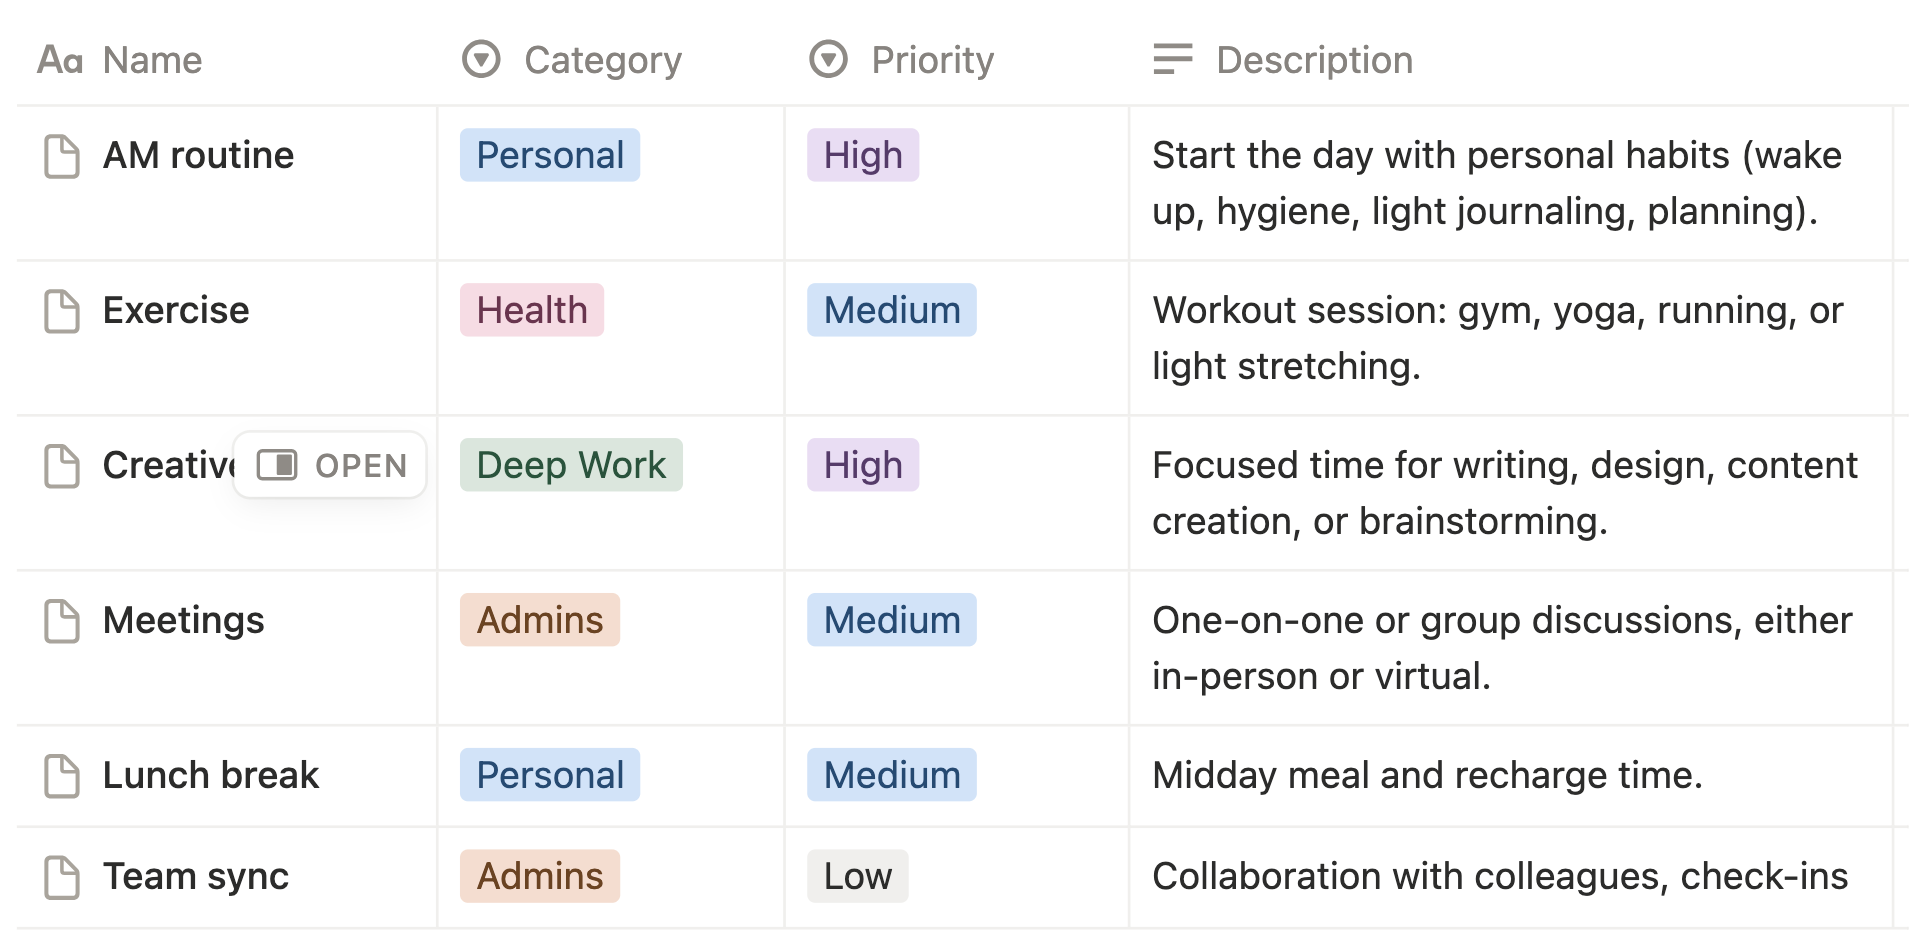
Step 2: Add Useful Properties
To make your database functional for time blocking, include these key properties:
- Activity Name – The title of the task or block (e.g., “Deep Work: Content Writing”).
- Category – Label it based on type (e.g., Deep Work, Admin, Fitness, Learning).
- Priority – Use tags like “High”, “Mid”, “Low”.
- Description – Specify the goal or intention of this activity
- Duration – Estimated time (e.g., 1 hour, 30 minutes).
- Energy Usage – Helps plan when to schedule this activity (High / Medium / Low).
This structure lets you filter, sort, and connect your tasks later when you build your daily time table.
Step 3: Categorize for Smarter Planning
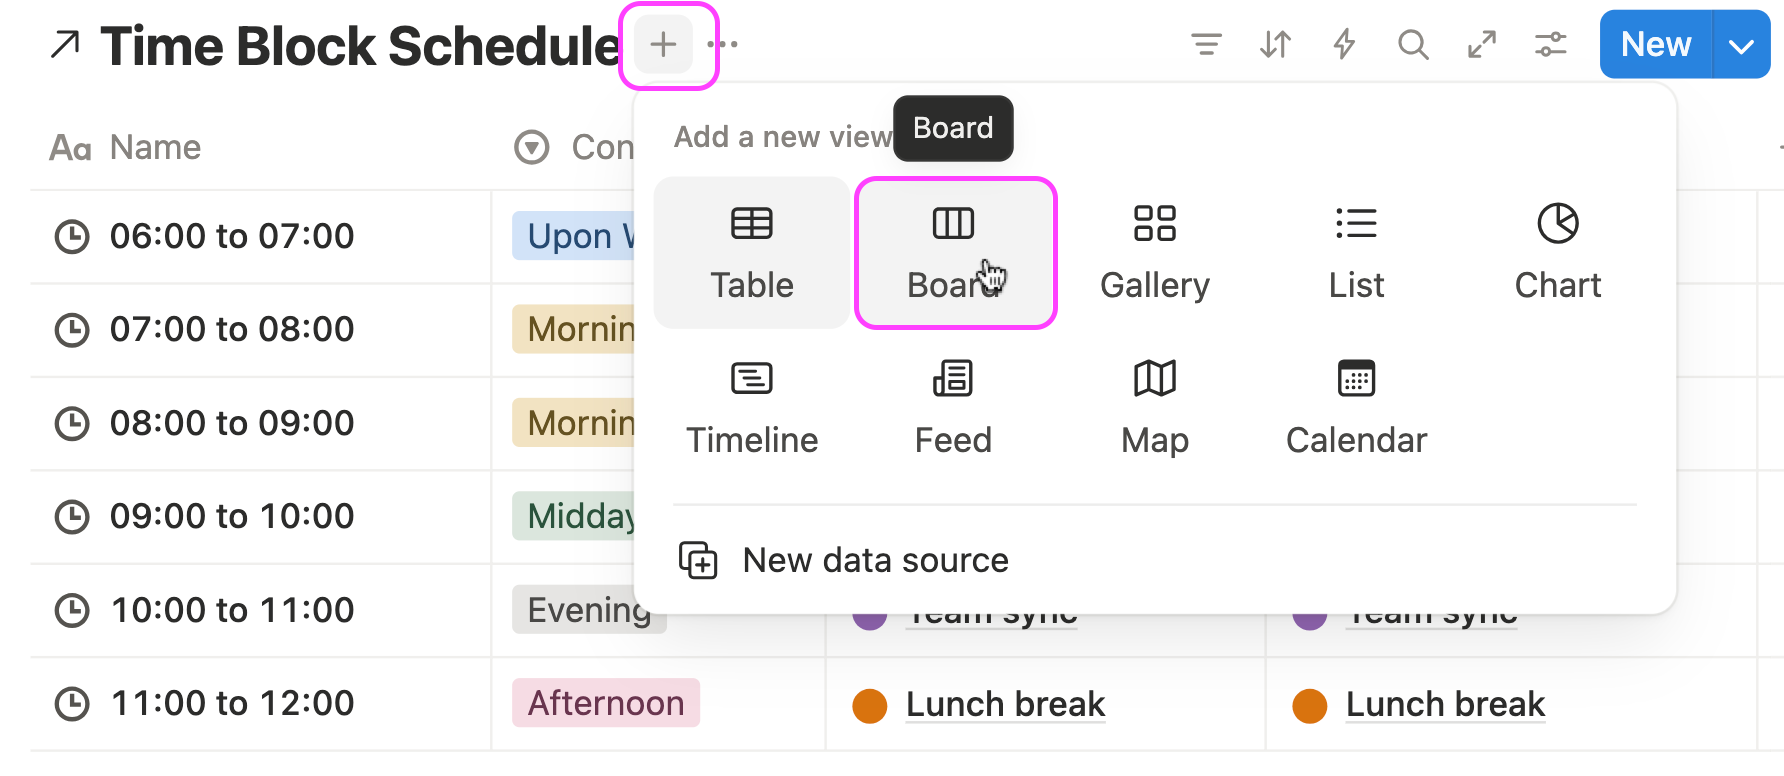
Create a Board View to group your activity list by context. For example:
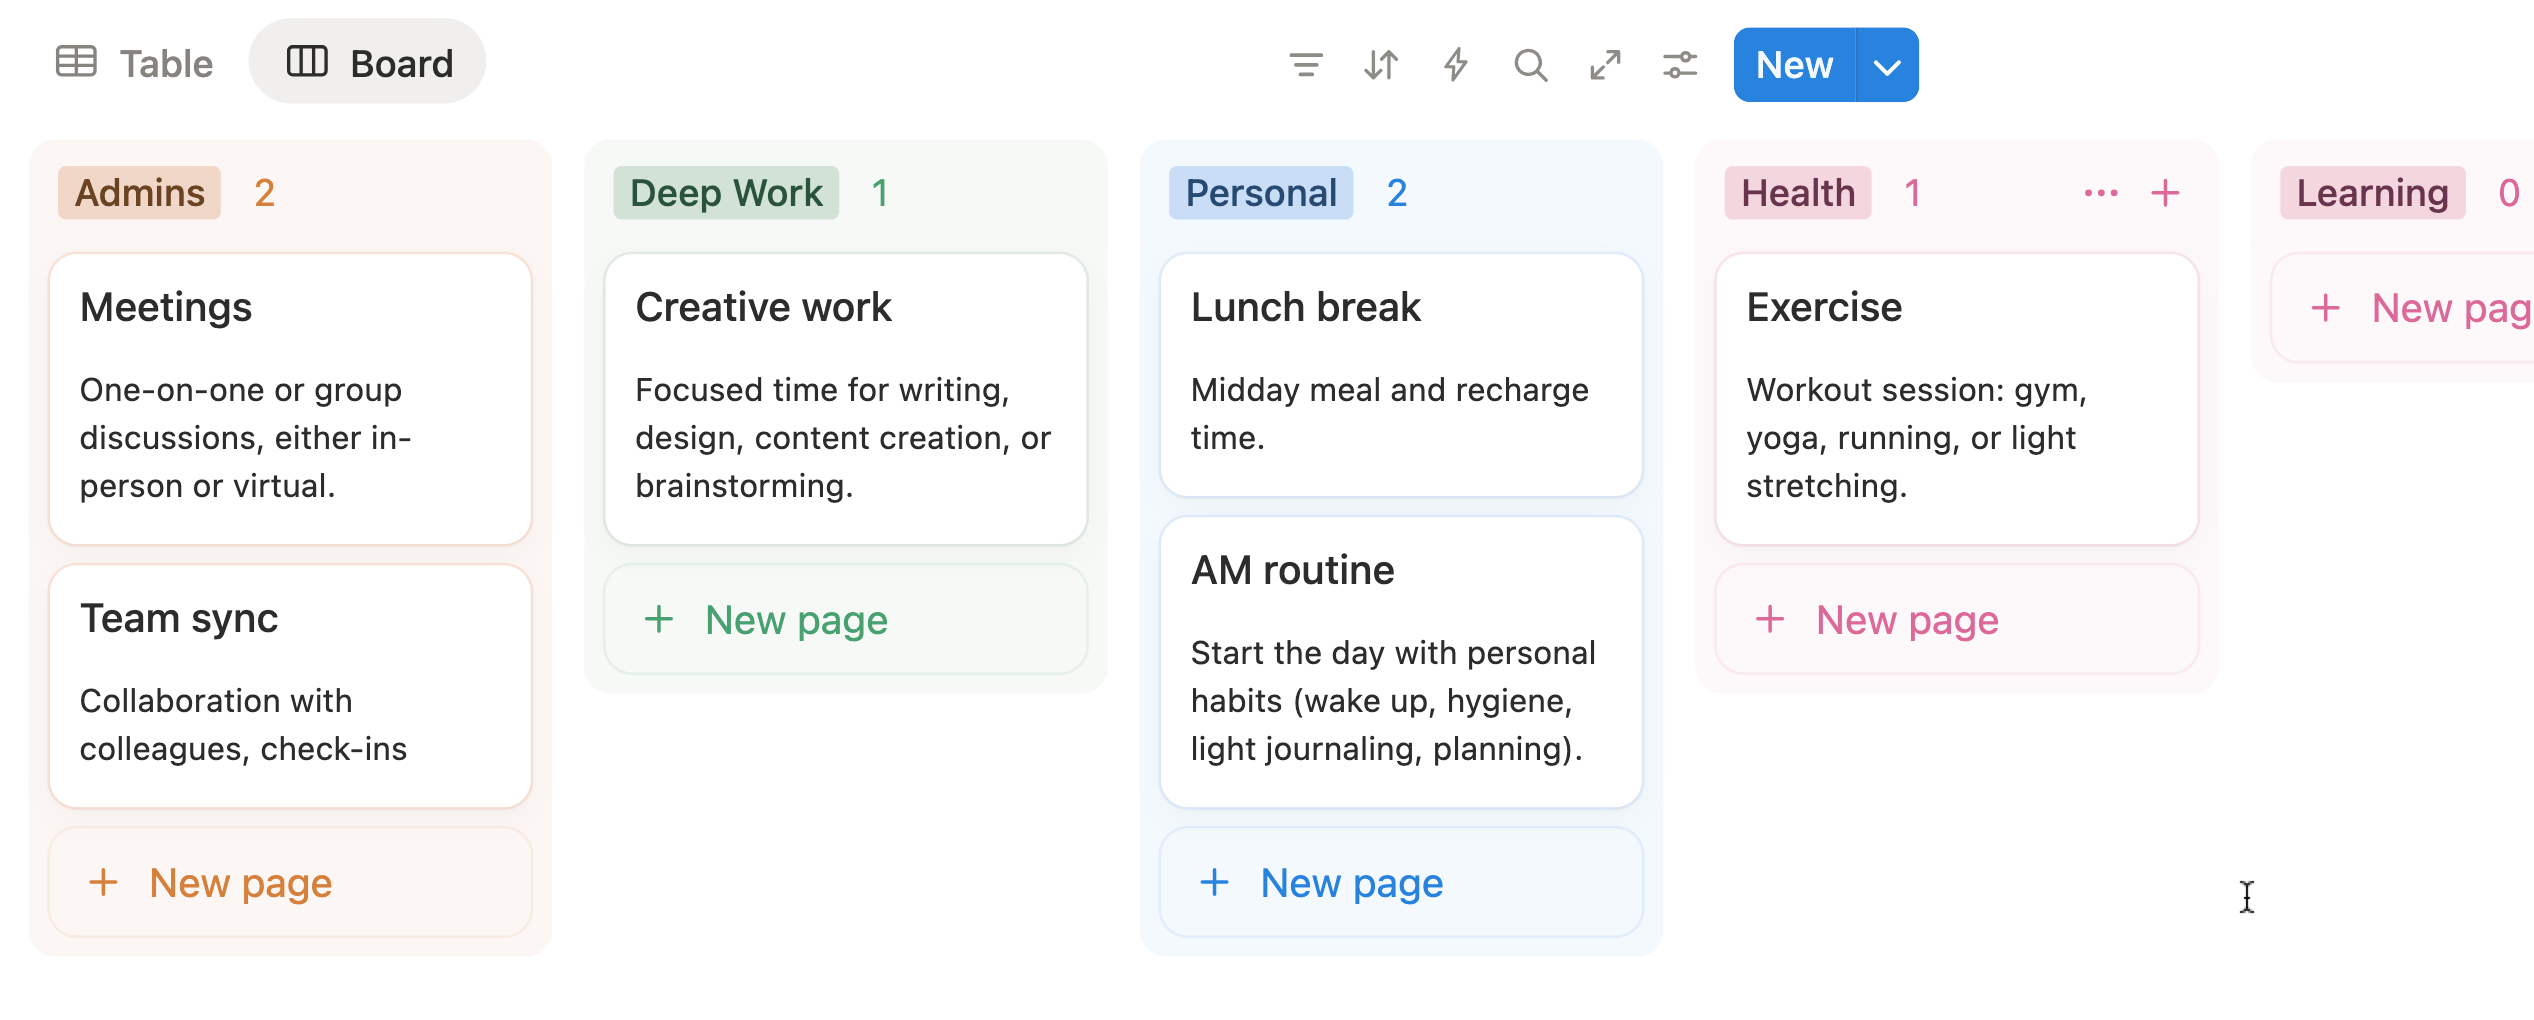
Click the “+” icon, add a new view, and select the Board option.

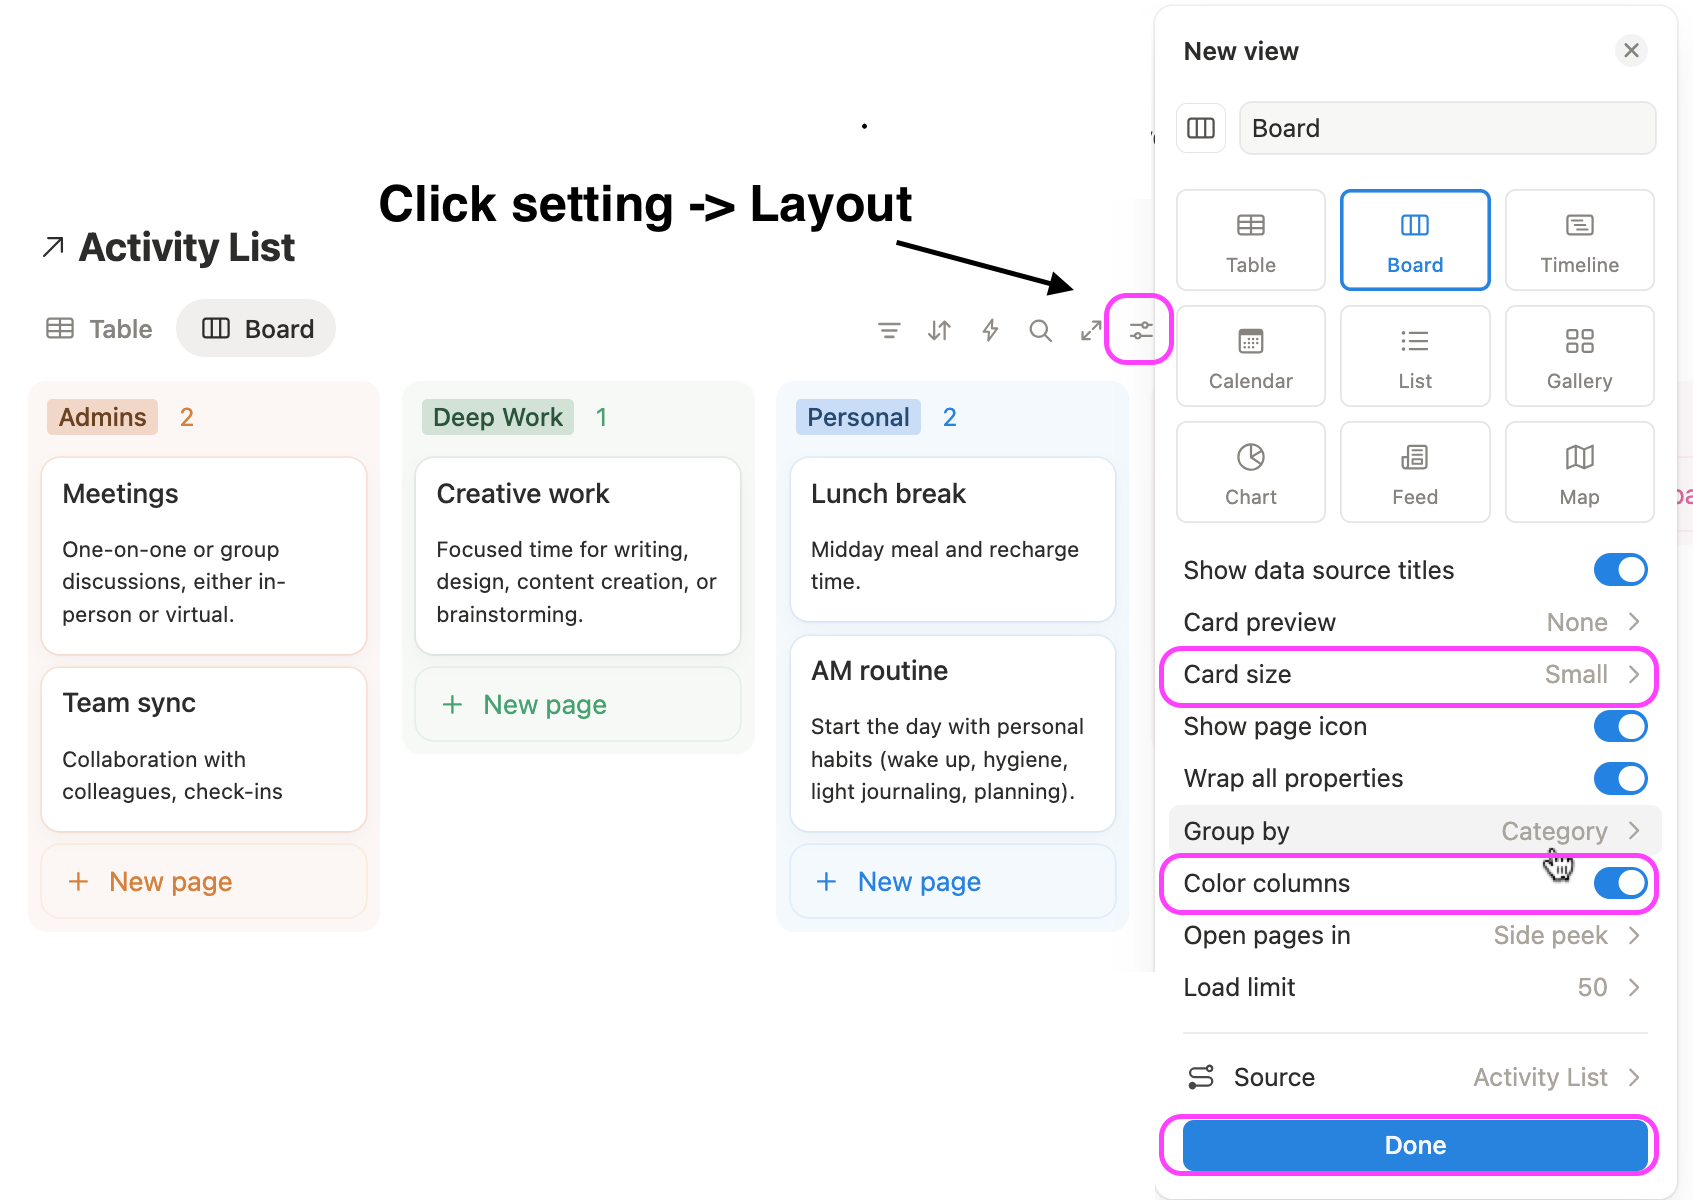
In the Layout settings, adjust the card size. You can choose to turn the Color Column on or off, depending on your preference.
Under Property Visibility settings, enable Description so it appears on each card in your Board View.
Step 4: Add Visual Cues
To make your planner visually intuitive, assign icons, colors, or emojis to each category. This small touch improves recognition and makes your Notion time blocking dashboard more enjoyable to use.
Create a timetable database in Notion
This is where you’ll map out your daily or weekly schedule and visually assign time blocks to each activity. Think of it as your digital calendar inside Notion, customized for deep work, personal routines, and productivity tracking.
A well-designed timetable database lets you plan your day hour by hour, track completed tasks, and analyze how your time is distributed across different contexts. It brings structure to your day while giving you full flexibility to adjust when needed — something traditional calendars can’t do as intuitively as Notion.
Step 1: Create a New Database for Time Blocks
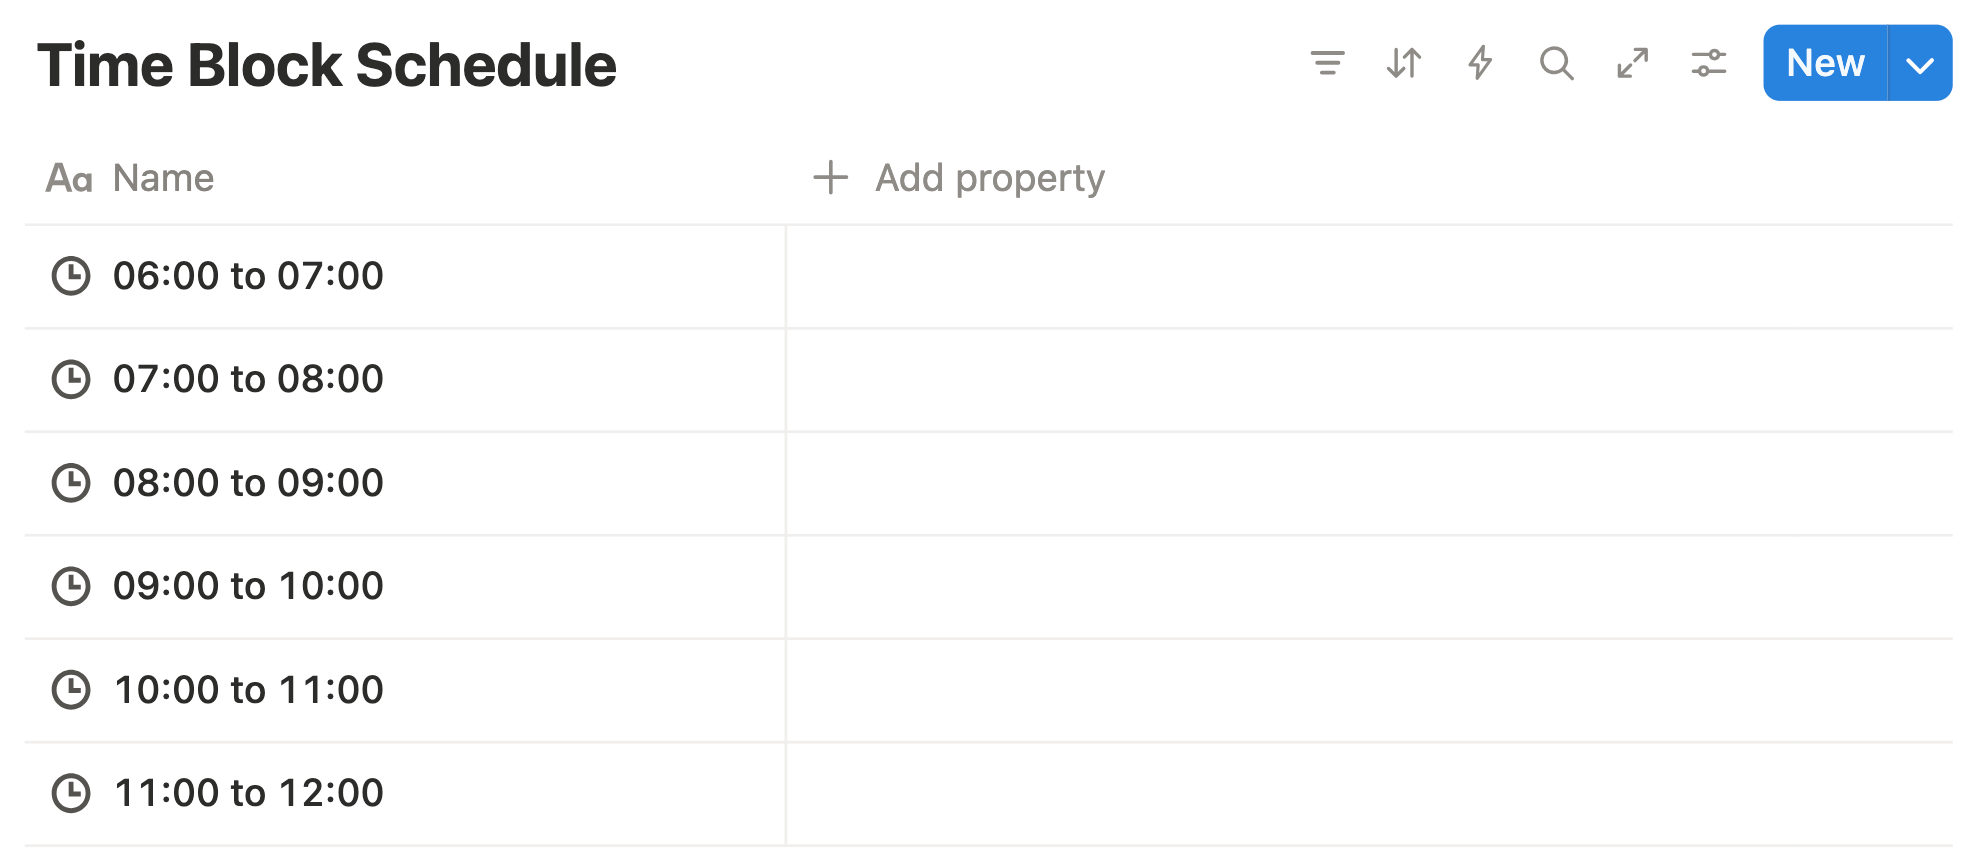
In your Notion workspace, create a new inline database called “Timetable” or “Daily Schedule.”
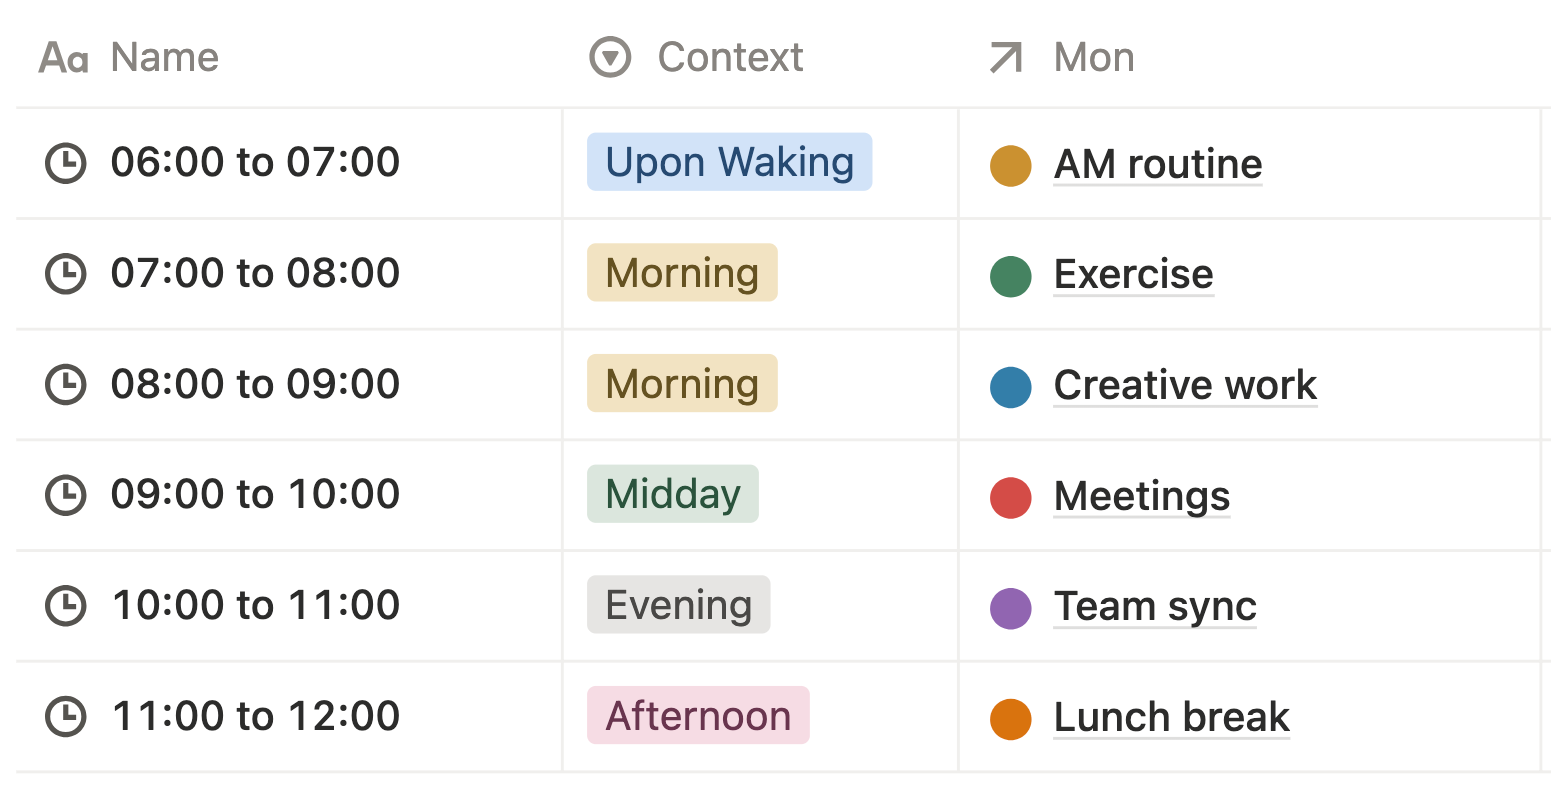
In the Name column, enter your time blocks. Each row (or entry) represents a single time block interval — a focused period dedicated to one task or activity.
Edit the icon of each time block with a custom emoji.
Step 2: Add Key Properties
To make your timetable useful for time blocking and analysis, set up the following essential properties:
- Name (Time Slots) – Define the time intervals for each block (e.g., 06:00–07:00, 07:00–08:00, and so on throughout the day).
- Context (Select Property) – Label each block by time of day, such as Morning, Midday, Afternoon, or Evening.
- Day of the Week – Monday, Tuesday, Wednesday, Thurday, Friday, etc. (We’ll cover this in a later step.)
- Linked Activity – A Relation property that connects your timetable to the Activity Database. (This will also be explained later.)
These properties give your time blocking system flexibility — you can switch between daily, weekly, and contextual views effortlessly.

Connect the databases in Notion
Now that you’ve built both your Activity Database and Timetable Database, it’s time to connect them together.
By linking your databases, you can assign activities directly to specific time blocks, roll up related data, and gain instant insights into how your day or week is structured.
This setup eliminates repetitive typing, keeps your planner consistent, and helps you analyze your time usage at a glance.
Step 1: Add a Relation Property
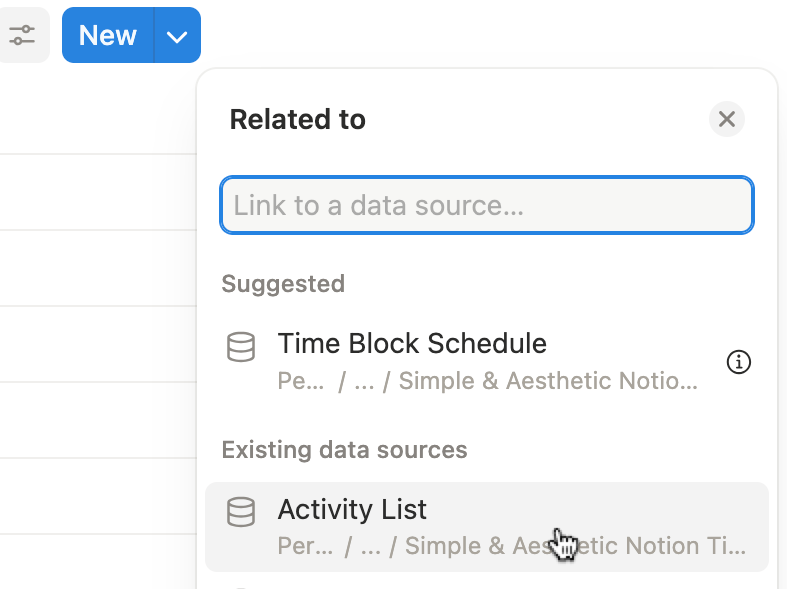
In your Time Block Schedule Database, add a new property:
Click + Add Property → Relation → Select your Activity Database “Activity List.”
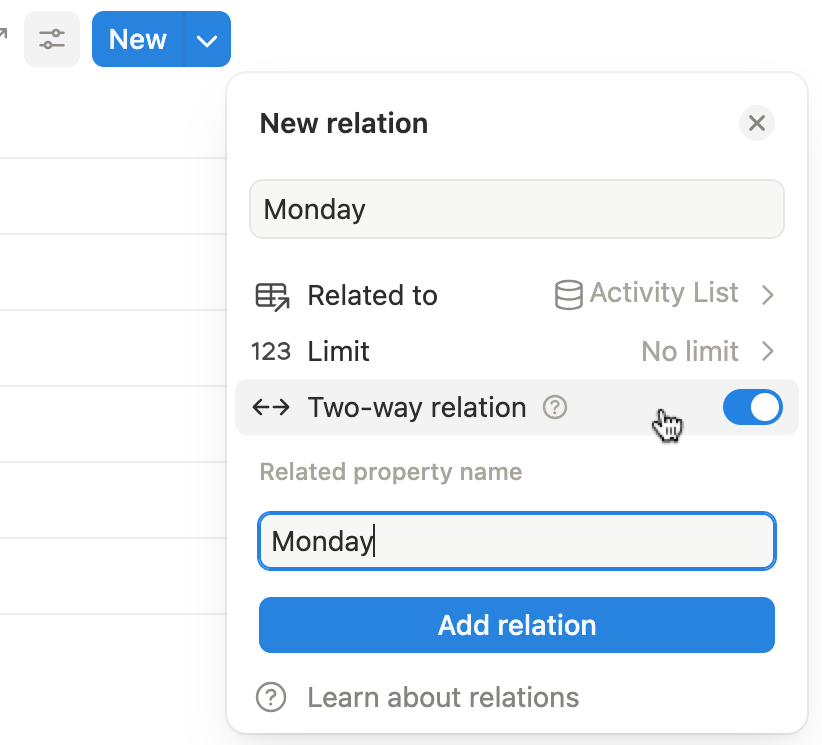
Name it “Monday.” Turn on Two-Way Relation.
Under Related Property Name, enter Monday so it displays the same title inside your Activity List.
Step 2: Add your Monday’s time block activities
This Relation setup creates a direct link between your Monday’s time block schedule and your activity list.
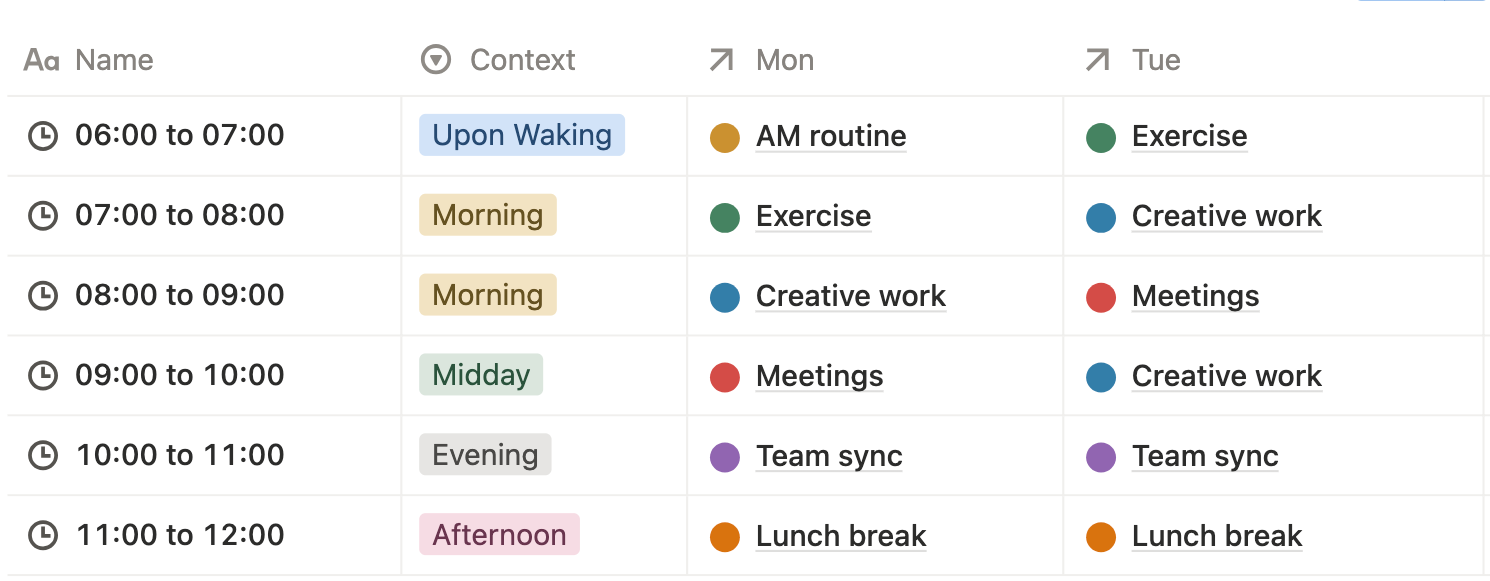
Now, you can select an activity from your activity list and add them throughout your Time Block Schedule.
For example:
Continue adding additional Relation properties to build out time blocks for Tuesday, Wednesday, Thursday, Friday, and so on. Then, link each one to the relevant activities. For example:
Step 2: Add Rollups for Extra Insights
After linking your databases, you can use Rollup properties to bring key details from your Activity Database into your timetable.
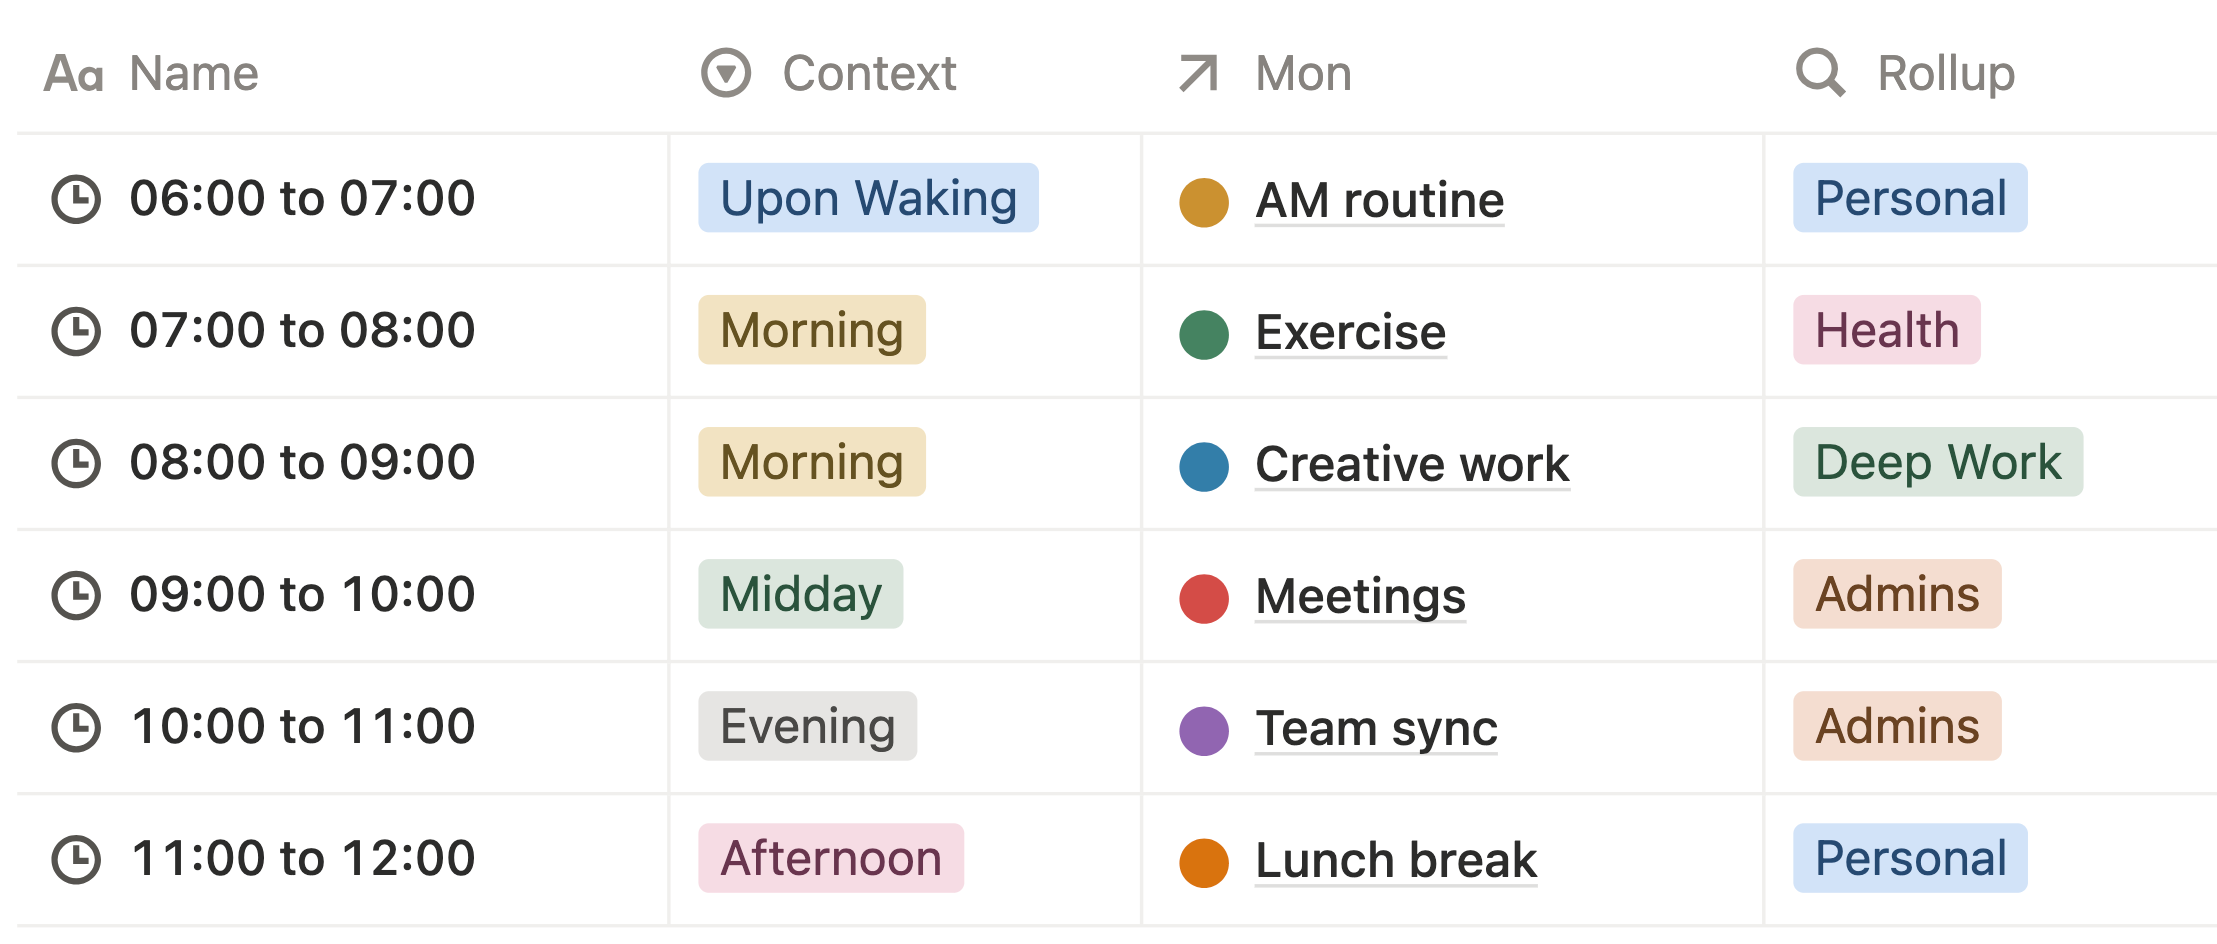
For example, create a Category Rollup to display the type of task linked to each time block. This gives you instant insight into what kind of work you’re doing throughout the day — right from your timetable view.
Add a Rollup property and name it “Mon_Cat” (short for Monday Category).
- Relation: Select Monday as the linked relation.
- Target Property: Choose Category.
- Show as: Select Original.
When you place the Monday time blocks and the Rollup column side by side, you’ll immediately see which category each time block belongs to — making your schedule easier to understand at a glance.
Set up context-based time blocking
Context-based time blocking means grouping and scheduling your activities based on their type or purpose (for example, Deep Work, Admin, Learning, or Personal).
It’s one of the most effective productivity methods because it helps you stay in flow, avoid multitasking, and dedicate full attention to one category of work at a time.
Step 1: Create Filtered Views by Context
In your Time Block Schedule Database, add a new Board View next to your existing Table View.
Link it to the existing data source — make sure it’s set to Time Block Schedule — and name this view “Monday” to display Monday’s themed schedule.
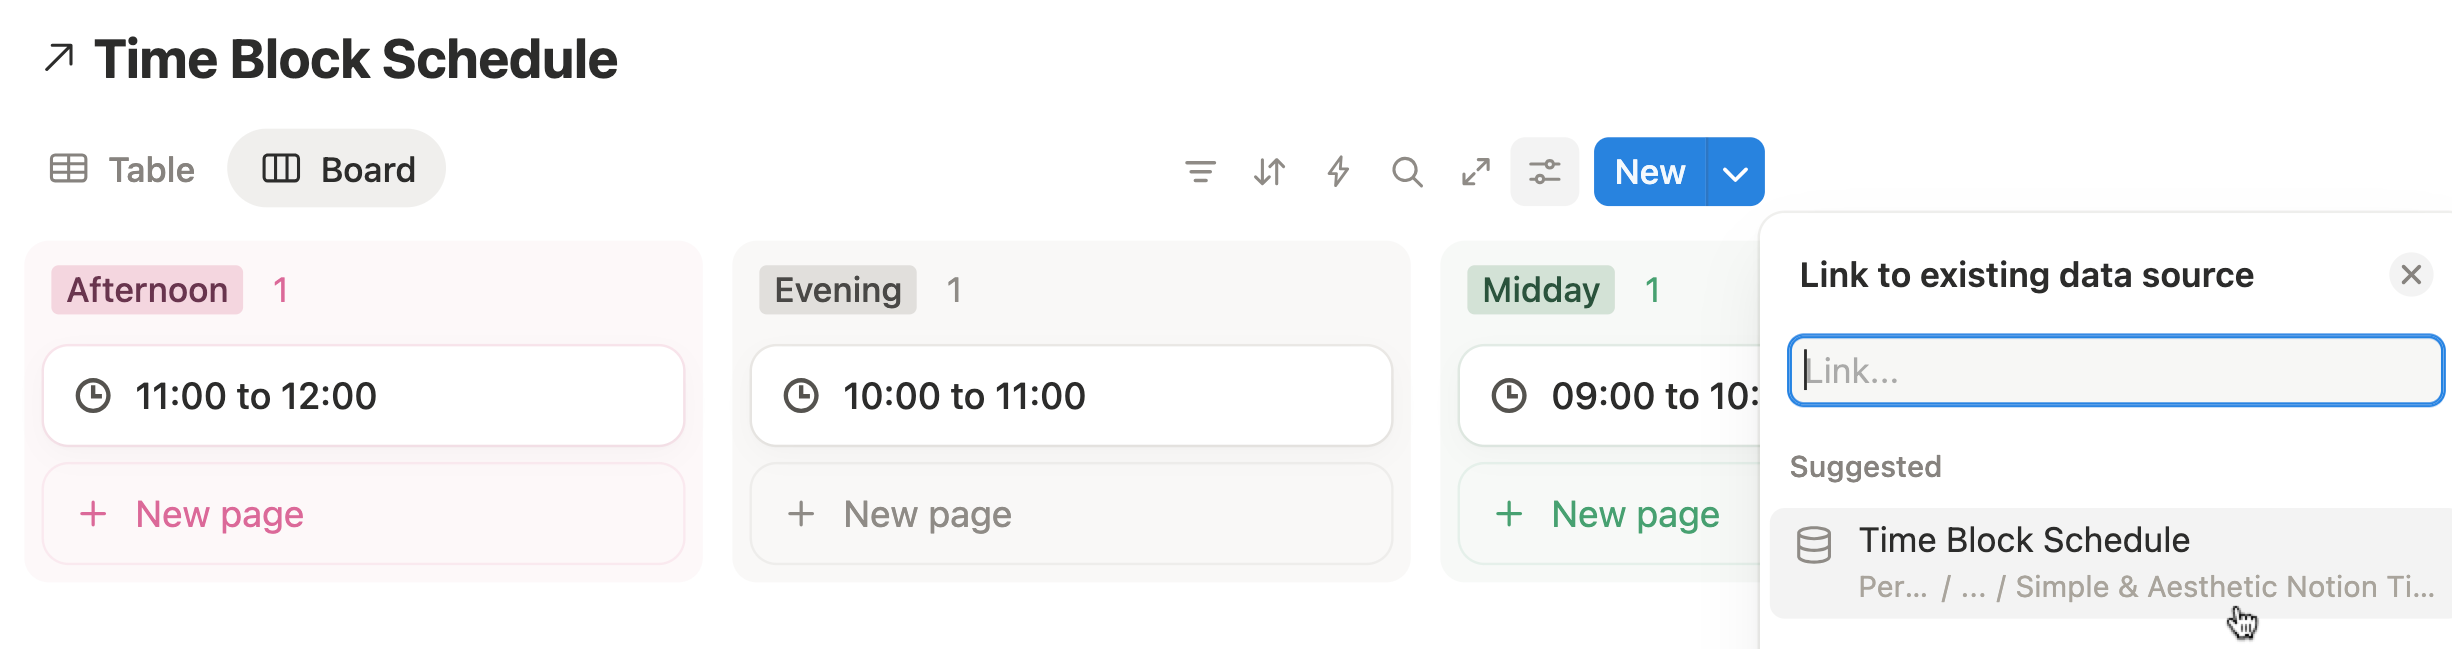
In the Group Settings, group items by Context, enable the Color Column, and rearrange the order so it flows naturally: Upon Waking → Morning → Midday → Afternoon → Evening.

Under Property Visibility, turn on the Monday Relation (which represents Monday’s activities) so they appear directly on each card.
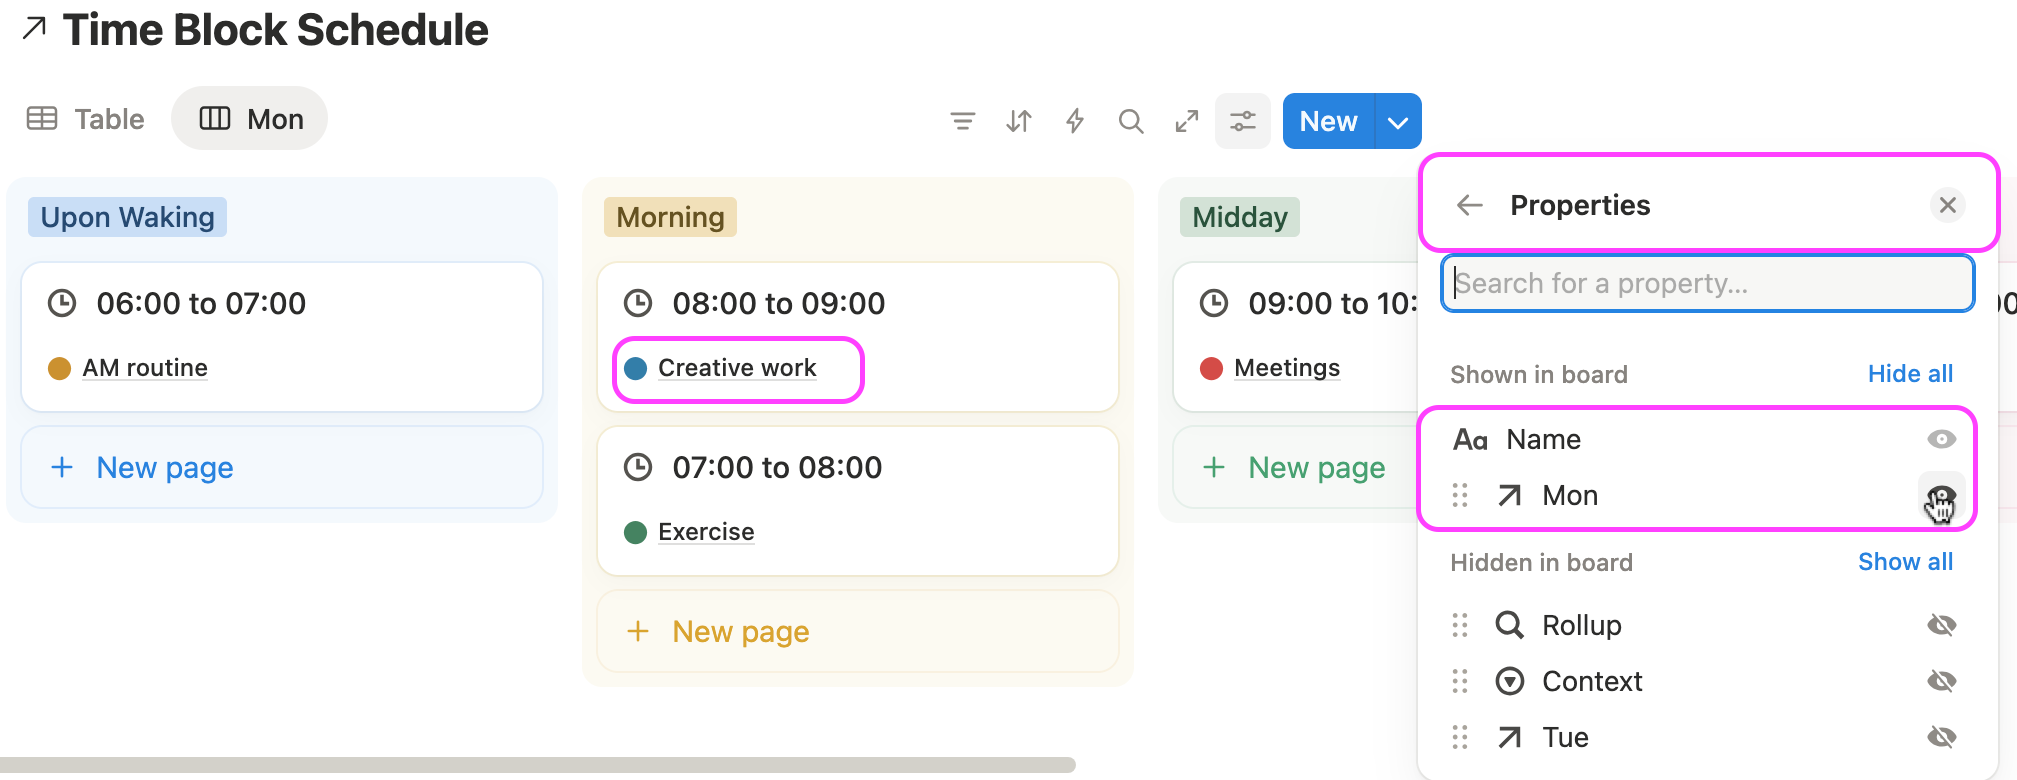
Continue setting up new Board Views for Tuesday, Wednesday, Thursday, Friday, and so on to create a more context-based time-blocking schedule.

Aesthetic Notion Time Blocking Template Download
Save time and start strong with this aesthetic Notion time blocking template — designed for deep work, focus, and effortless scheduling.
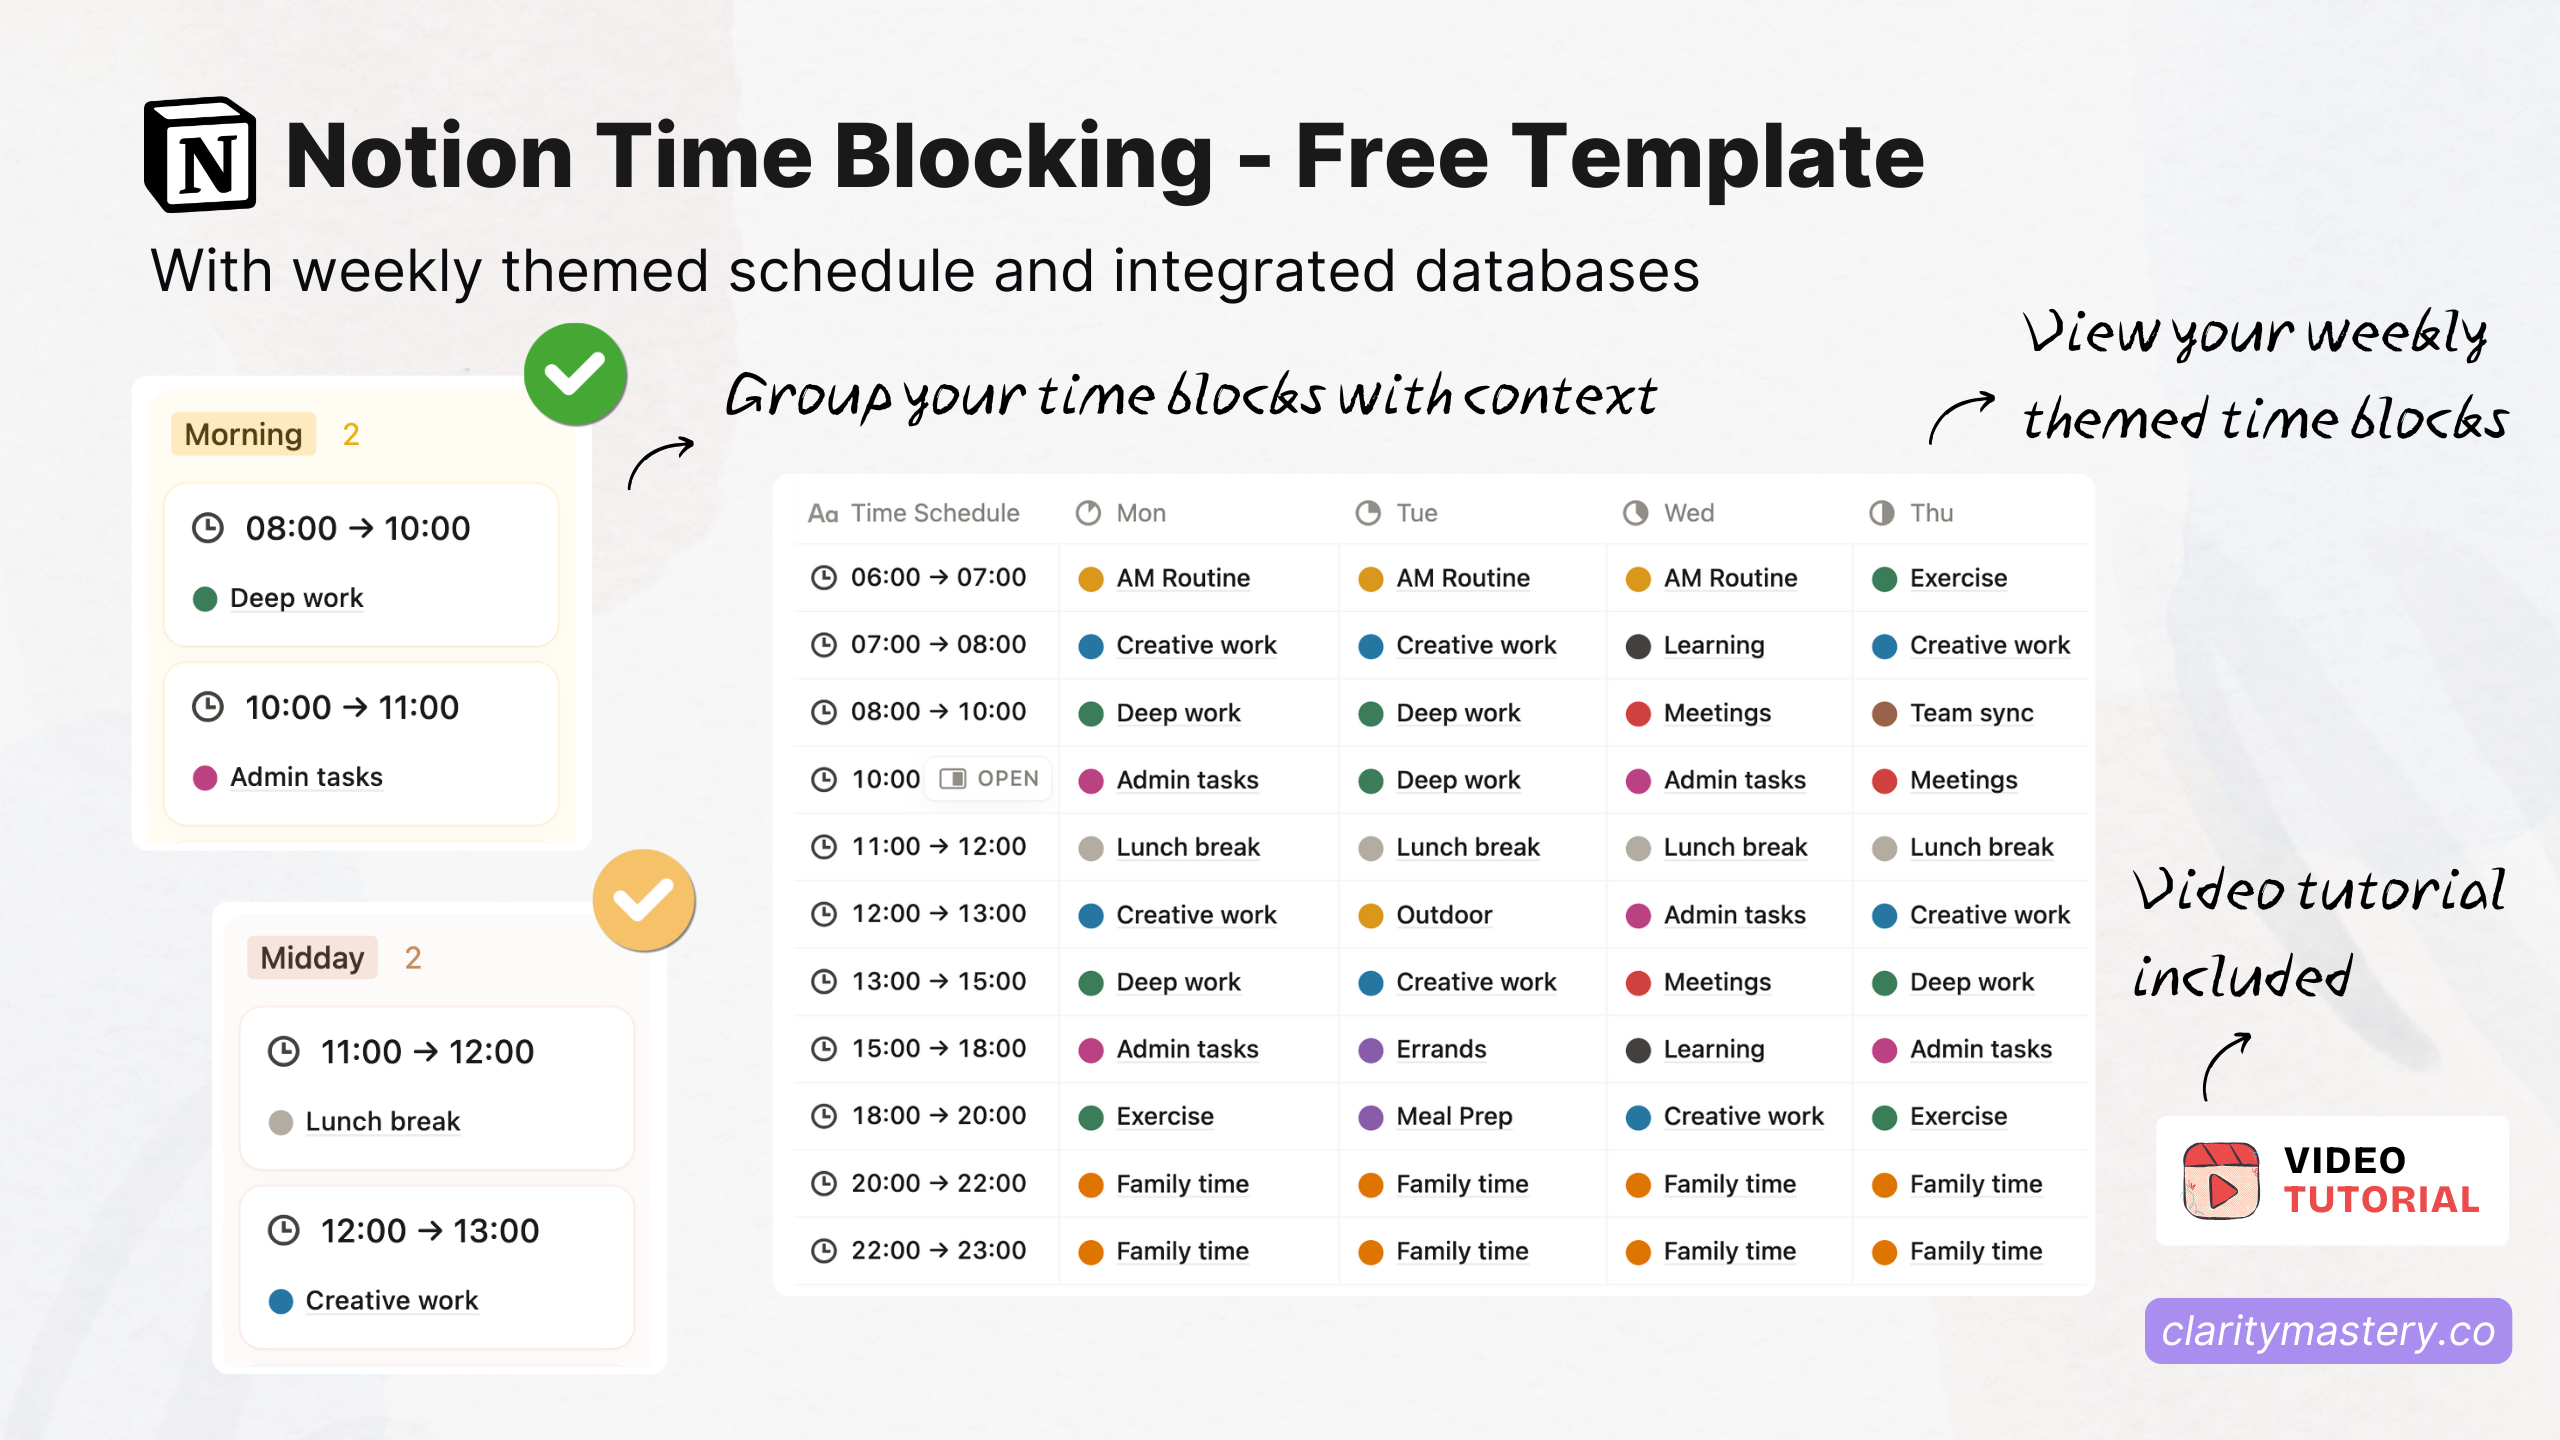
👉 Download the Notion Time Blocking Template and start planning your day the smart way.
Frequently Asked Questions
What is time blocking in Notion and how does it work?
Time blocking in Notion is a simple yet powerful productivity method where you schedule specific time slots for each task or activity. Instead of working from a long to-do list, you plan your day visually in a Notion database or calendar view. This method helps you focus better, manage your energy levels, and maintain a clear overview of your daily and weekly schedule — all within your customized Notion productivity dashboard.
How do I create a time blocking planner in Notion from scratch?
To build a Notion time blocking planner, start by listing your activities in an Activity Database. Then, create a Timetable Database to map your daily or weekly schedule. Connect both databases using Relation and Rollup properties to link each time block with its corresponding task. Finally, design a dashboard view for a clean, visual layout of your time blocking schedule.
Why use Notion for time blocking instead of Google Calendar or paper planners?
Unlike traditional calendars, Notion time blocking gives you full control and customization. You can connect multiple databases, tag contexts like “Deep Work” or “Morning Routine,” and analyze how your time is spent. With Notion, your time blocking system becomes flexible, visual, and fully integrated with your daily planner, tasks, and goals — something Google Calendar or paper planners can’t match.
What properties should I include in my Notion time blocking database?
Essential properties include Time Slots, Context, Start Time, End Time, Day of the Week, and Linked Activity. These properties make your Notion time blocking planner structured and adaptable. You can also add Rollups to view related details such as task category or priority — perfect for optimizing your daily and weekly planning workflow.
How do I link activities to my Notion time blocking schedule?
To link activities, use a Relation property to connect your Time Block Schedule Database with your Activity Database. This lets you assign each task to a specific time block and day. When you view your Notion time blocking dashboard, you’ll see related tasks automatically appear in the right time slots, creating a seamless, connected productivity system.
Can I use Notion time blocking for deep work and focus sessions?
Absolutely. Notion time blocking is ideal for deep work, as it lets you dedicate uninterrupted blocks of time to high-focus tasks. You can label these blocks by context or energy level (e.g., “High Focus,” “Admin,” “Creative Work”) to plan your day around your natural productivity rhythm. It’s a great way to reduce multitasking and improve focus using Notion.
How do I make my Notion time blocking dashboard look aesthetic?
Use clean layouts, minimal icons, and consistent color coding for each context. Combine Board View and Timeline Viewto visualize your day or week beautifully. You can also use an aesthetic Notion time blocking template as a starting point — it’s pre-styled with a modern design and ready to customize for your workflow.